Introduction
NVIDIA Base Command Manager (BCM) is a powerful cluster management platform designed for high-performance computing and AI workloads. While traditionally deployed on bare metal or conventional VMs, this guide demonstrates how to successfully deploy BCM v11.0 on OpenShift Virtualization (formerly KubeVirt), enabling cloud-native HPC infrastructure.
This deployment pattern is particularly valuable for organizations looking to:
- Modernize HPC infrastructure with Kubernetes
- Leverage existing OpenShift investments for AI/ML workloads
- Enable dynamic GPU resource management in containerized environments
- Simplify BCM deployment and lifecycle management
Prerequisites
Before starting, ensure you have:
- OpenShift Cluster: Single-node or multi-node OpenShift 4.19+ cluster
- Storage: LVMS (Logical Volume Manager Storage) or ODF for persistent volumes
- Resources: At least 32GB RAM and 500GB storage for the BCM VM
- BCM License: You can request a free license, for up to eight accelerators per system—NVIDIA GPU-accelerated or other—in any cluster size
- BCM ISO: Downloaded from NVIDIA BCM ISO Portal (bcm-11.0-ubuntu2404.iso)
- CLI Tools:
oc(OpenShift CLI)virtctl(KubeVirt CLI - installable via Homebrew on macOS)
Architecture Overview
The final architecture consists of:
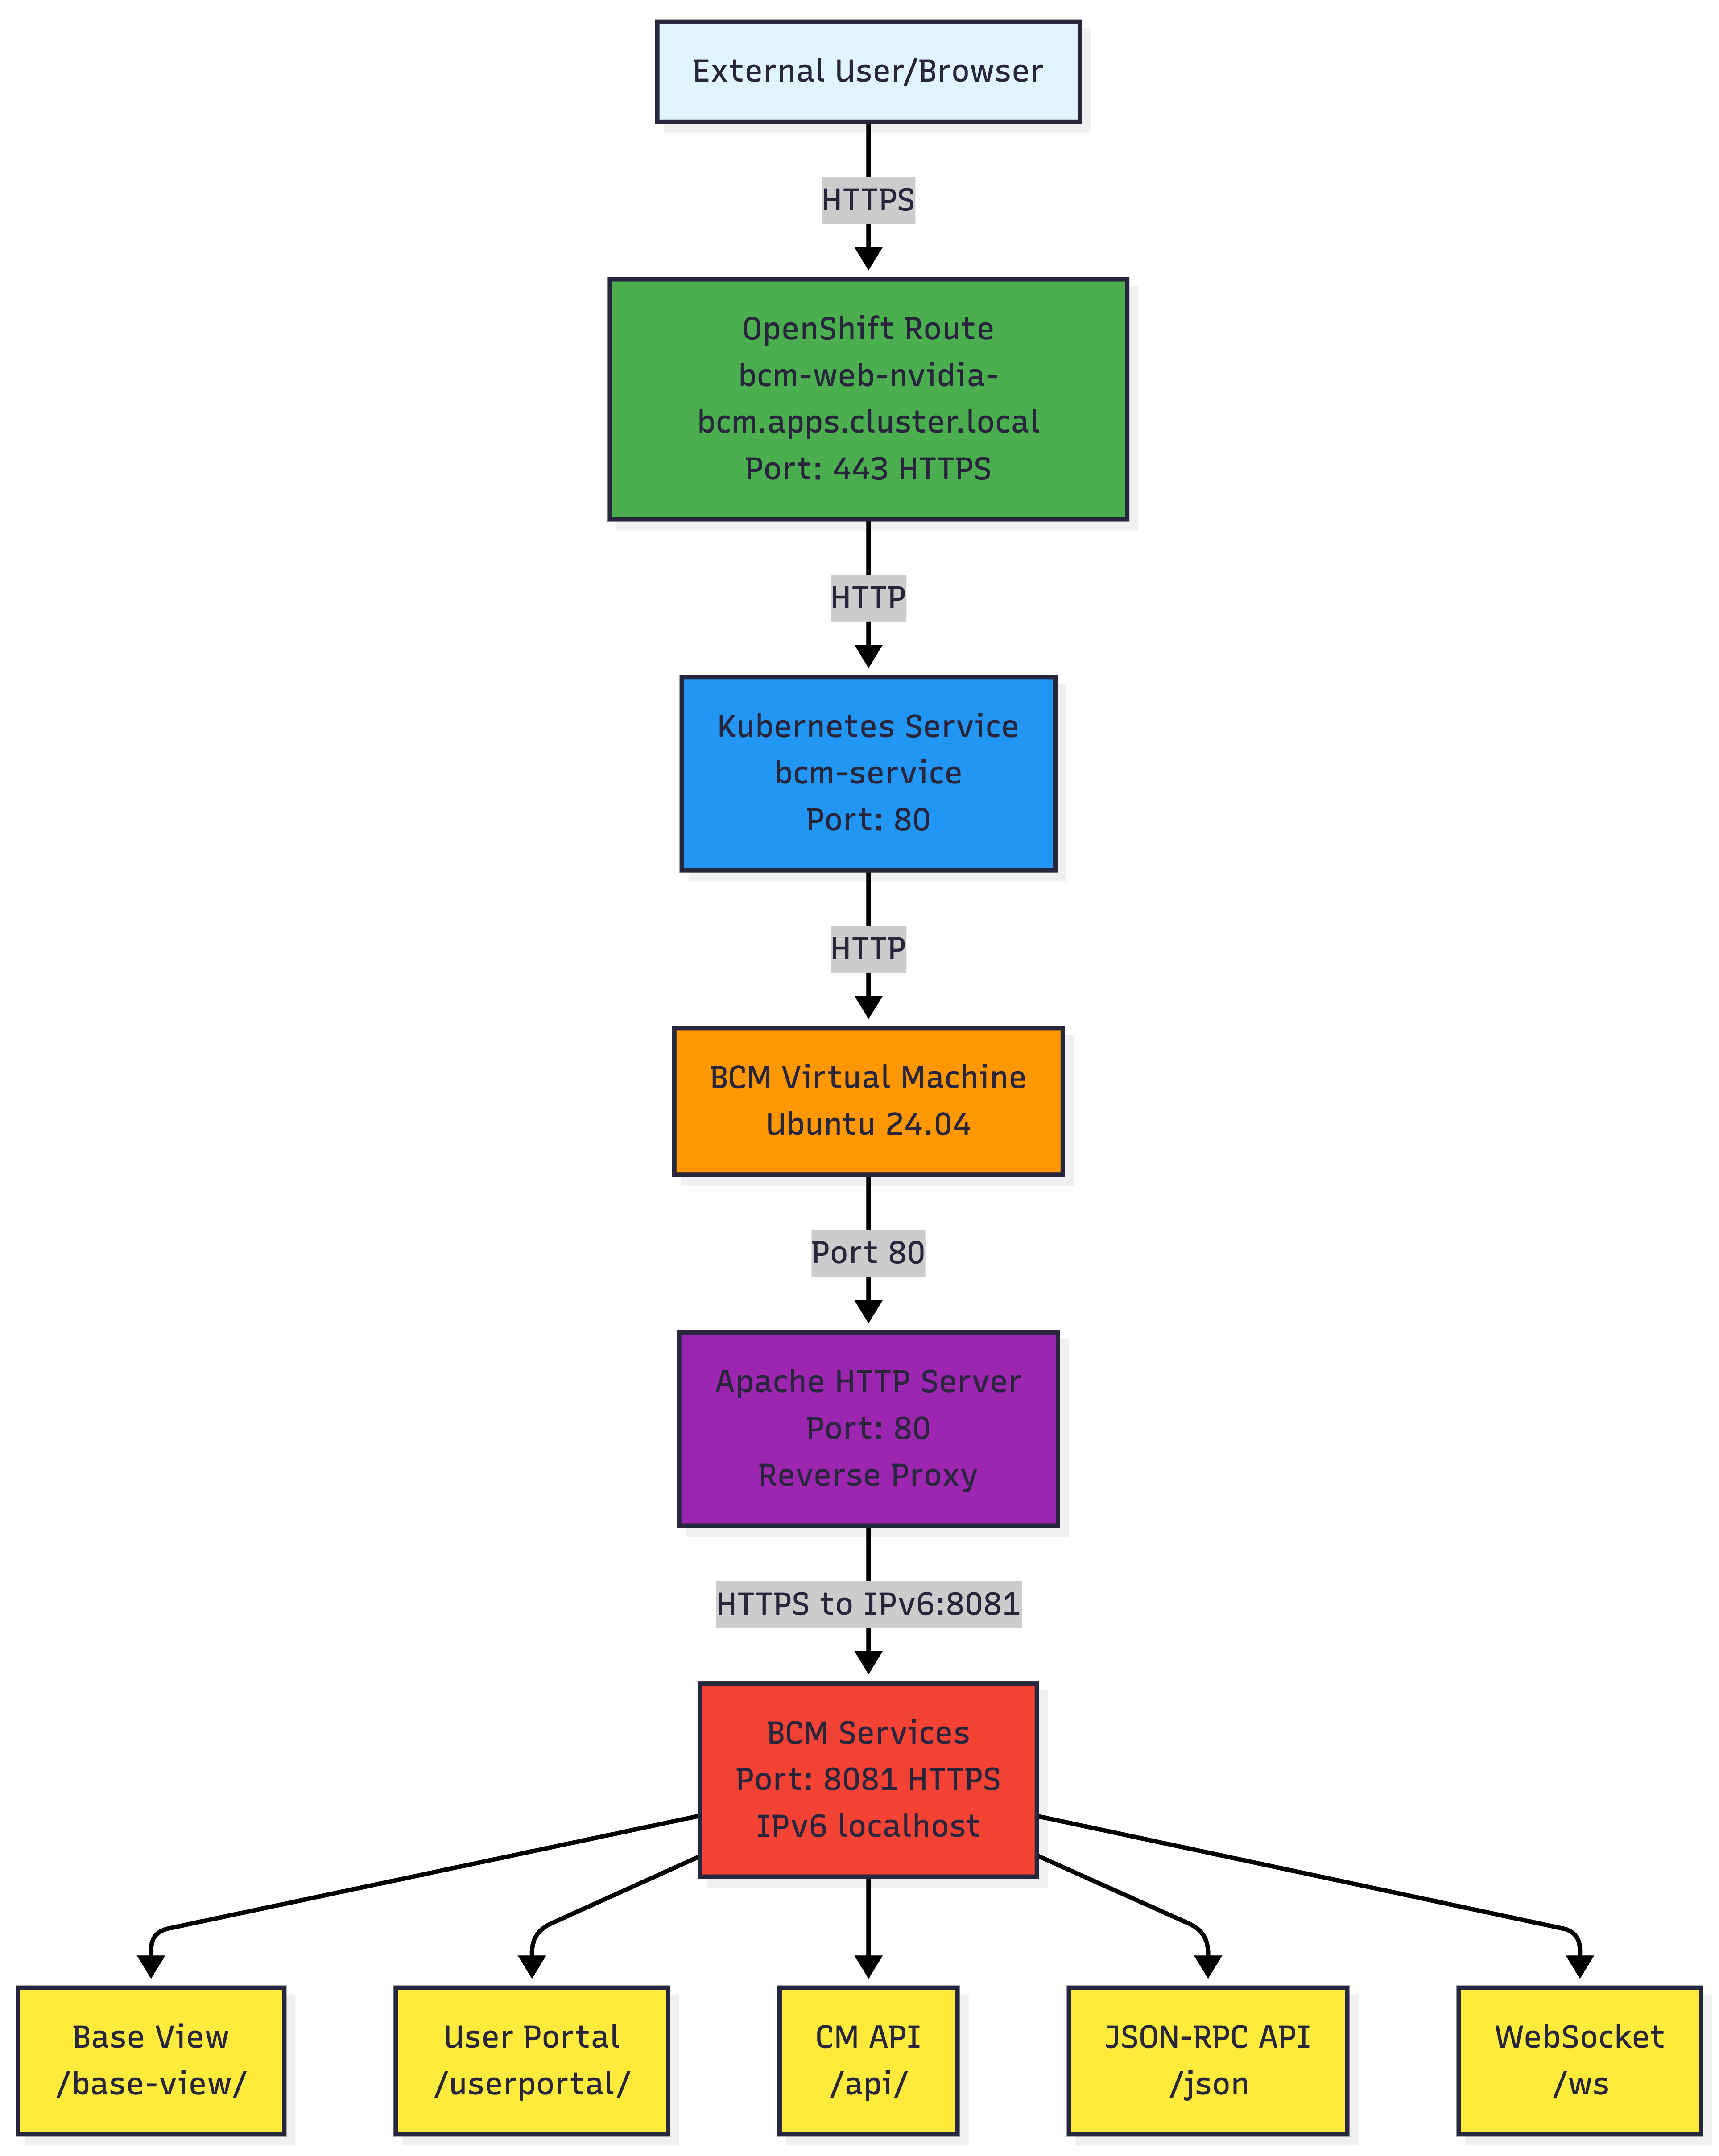
Key Components
- OpenShift Route: TLS termination and external access point
- Kubernetes Service: Internal load balancer with VM endpoint
- BCM VM: Ubuntu 24.04 running BCM head node
- Apache Reverse Proxy: Bridges port 80 → 8081 and IPv4 → IPv6
- BCM Services: Core cluster management services on port 8081
Step 1: Install OpenShift Virtualization Operator
1.1 Install the Operator
Navigate to the OpenShift web console:
- Go to Operators → OperatorHub
- Search for “OpenShift Virtualization”
- Click Install
- Accept defaults and click Install
Or via CLI:
cat <<EOF | oc apply -f -
apiVersion: v1
kind: Namespace
metadata:
  name: openshift-cnv
---
apiVersion: operators.coreos.com/v1
kind: OperatorGroup
metadata:
  name: kubevirt-hyperconverged-group
  namespace: openshift-cnv
spec:
  targetNamespaces:
  - openshift-cnv
---
apiVersion: operators.coreos.com/v1alpha1
kind: Subscription
metadata:
  name: hco-operatorhub
  namespace: openshift-cnv
spec:
  source: redhat-operators
  sourceNamespace: openshift-marketplace
  name: kubevirt-hyperconverged
  startingCSV: kubevirt-hyperconverged-operator.v4.14.0
  channel: "stable"
EOF
1.2 Create HyperConverged Resource
cat <<EOF | oc apply -f -
apiVersion: hco.kubevirt.io/v1beta1
kind: HyperConverged
metadata:
  name: kubevirt-hyperconverged
  namespace: openshift-cnv
spec:
  featureGates:
    enableCommonBootImageImport: true
    deployKubeSecondaryDNS: true
EOF
1.3 Verify Installation
# Check operator status
oc get csv -n openshift-cnv

# Check HyperConverged status
oc get hco -n openshift-cnv kubevirt-hyperconverged

# Should show Ready: true
Step 2: Configure Storage for Virtualization
2.1 Annotate Storage Class for Virtualization
For single-node deployments with LVMS:
# Check your storage class
oc get storageclass

# Annotate it for virtualization use
oc annotate storageclass lvms-nvme \
  storageclass.kubevirt.io/is-default-virt-class="true"
Note: The warning about lack of RWX (ReadWriteMany) support is expected and acceptable for single-node deployments since live migration requires multiple nodes anyway.
Step 3: Create BCM Network Configuration
BCM requires two network interfaces:
- External network: For web UI and external access
- Internal network: For BCM ↔ Compute node communication

3.1 Create Internal Network
cat <<EOF | oc apply -f -
apiVersion: k8s.cni.cncf.io/v1
kind: NetworkAttachmentDefinition
metadata:
  name: bcm-internal-network
  namespace: nvidia-bcm
spec:
  config: |
    {
      "cniVersion": "0.3.1",
      "name": "bcm-internal",
      "type": "bridge",
      "bridge": "bcm-br0",
      "ipam": {
        "type": "host-local",
        "subnet": "192.168.100.0/24",
        "rangeStart": "192.168.100.10",
        "rangeEnd": "192.168.100.250",
        "gateway": "192.168.100.1"
      }
    }
EOF
Step 4: Upload BCM ISO
4.1 Create Project
oc new-project nvidia-bcm
4.2 Create DataVolume for ISO
cat <<EOF | oc apply -f -
apiVersion: cdi.kubevirt.io/v1beta1
kind: DataVolume
metadata:
  name: bcm-installer-iso
  namespace: nvidia-bcm
  annotations:
    cdi.kubevirt.io/storage.usePopulator: "false"
spec:
  source:
    upload: {}
  storage:
    accessModes:
    - ReadWriteOnce
    resources:
      requests:
        storage: 15Gi
    storageClassName: lvms-nvme
EOF
4.3 Upload ISO Using virtctl
Important: Use the --force-bind flag for storage classes with WaitForFirstConsumer binding mode:
virtctl image-upload dv bcm-installer-iso \
  --namespace nvidia-bcm \
  --image-path=bcm-11.0-ubuntu2404.iso \
  --size=15Gi \
  --insecure \
  --force-bind \
  --uploadproxy-url=https://$(oc get route -n openshift-cnv cdi-uploadproxy -o jsonpath='{.spec.host}')
Alternatively, use the OpenShift web console:
- Navigate to Virtualization → Bootable volumes
- Click Add volume → Upload data
- Select your ISO file
- Set size to 15Gi and storage class to
lvms-nvme
4.4 Verify Upload
oc get dv bcm-installer-iso -n nvidia-bcm
# Should show PHASE: Succeeded
Step 5: Create BCM Virtual Machine
5.1 Create VM Definition
cat <<EOF | oc apply -f -
apiVersion: kubevirt.io/v1
kind: VirtualMachine
metadata:
  name: nvidia-bcm
  namespace: nvidia-bcm
  labels:
    app: nvidia-bcm
spec:
  running: false
  template:
    metadata:
      labels:
        kubevirt.io/vm: nvidia-bcm
    spec:
      domain:
        cpu:
          cores: 8
          sockets: 1
          threads: 1
        devices:
          disks:
          - name: rootdisk
            disk:
              bus: virtio
            bootOrder: 2
          - name: installation-cdrom
            cdrom:
              bus: sata
              readonly: true
            bootOrder: 1
          interfaces:
          - name: external
            masquerade: {}
            ports:
            - name: ssh
              port: 22
            - name: http
              port: 80
            - name: https
              port: 443
          - name: internal
            bridge: {}
        machine:
          type: q35
        resources:
          requests:
            memory: 32Gi
      networks:
      - name: external
        pod: {}
      - name: internal
        multus:
          networkName: bcm-internal-network
      volumes:
      - name: rootdisk
        dataVolume:
          name: bcm-root-disk
      - name: installation-cdrom
        persistentVolumeClaim:
          claimName: bcm-installer-iso
  dataVolumeTemplates:
  - metadata:
      name: bcm-root-disk
    spec:
      storage:
        accessModes:
        - ReadWriteOnce
        resources:
          requests:
            storage: 500Gi
        storageClassName: lvms-nvme
      source:
        blank: {}
EOF
Key Configuration Notes:
- Boot Order: CD-ROM first (bootOrder: 1) for installation
- Two Networks: External for management, Internal for cluster communication
- Memory: 32Gi recommended (minimum 16Gi)
- Disk: 500Gi for BCM installation and data
5.2 Start the VM
virtctl start nvidia-bcm -n nvidia-bcm

# Watch VM status
oc get vm,vmi -n nvidia-bcm -w
Step 6: Install BCM
6.1 Access VM Console
Via Web Console:
- Navigate to Virtualization → VirtualMachines → nvidia-bcm
- Click Console tab
- Select VNC Console
Via CLI:
virtctl vnc nvidia-bcm -n nvidia-bcm
6.2 BCM Installation Process
Follow the BCM installer prompts:
- Language/Locale: Select your preferences
- Network Configuration:
- External network (enp1s0): Configure with DHCP or static IP
- Internal network (enp2s0): Configure as
192.168.100.10/24
- Networks Configuration:
- internalnet:
- Base IP:
192.168.100.0 - Netmask:
255.255.255.0 - Dynamic range:
192.168.100.50-192.168.100.200 - Domain:
bcm.internal
- Base IP:
- externalnet: Configure based on your network
- internalnet:
- Disk Layout: Accept defaults (500GB will be partitioned)
- Admin Password: Set strong password for BCM admin user
- Installation: Wait for completion (15-30 minutes)
6.3 Post-Installation
After installation completes:
- VM will reboot automatically
- Login credentials: Use the admin password you set during installation
Step 7: Configure Network Access
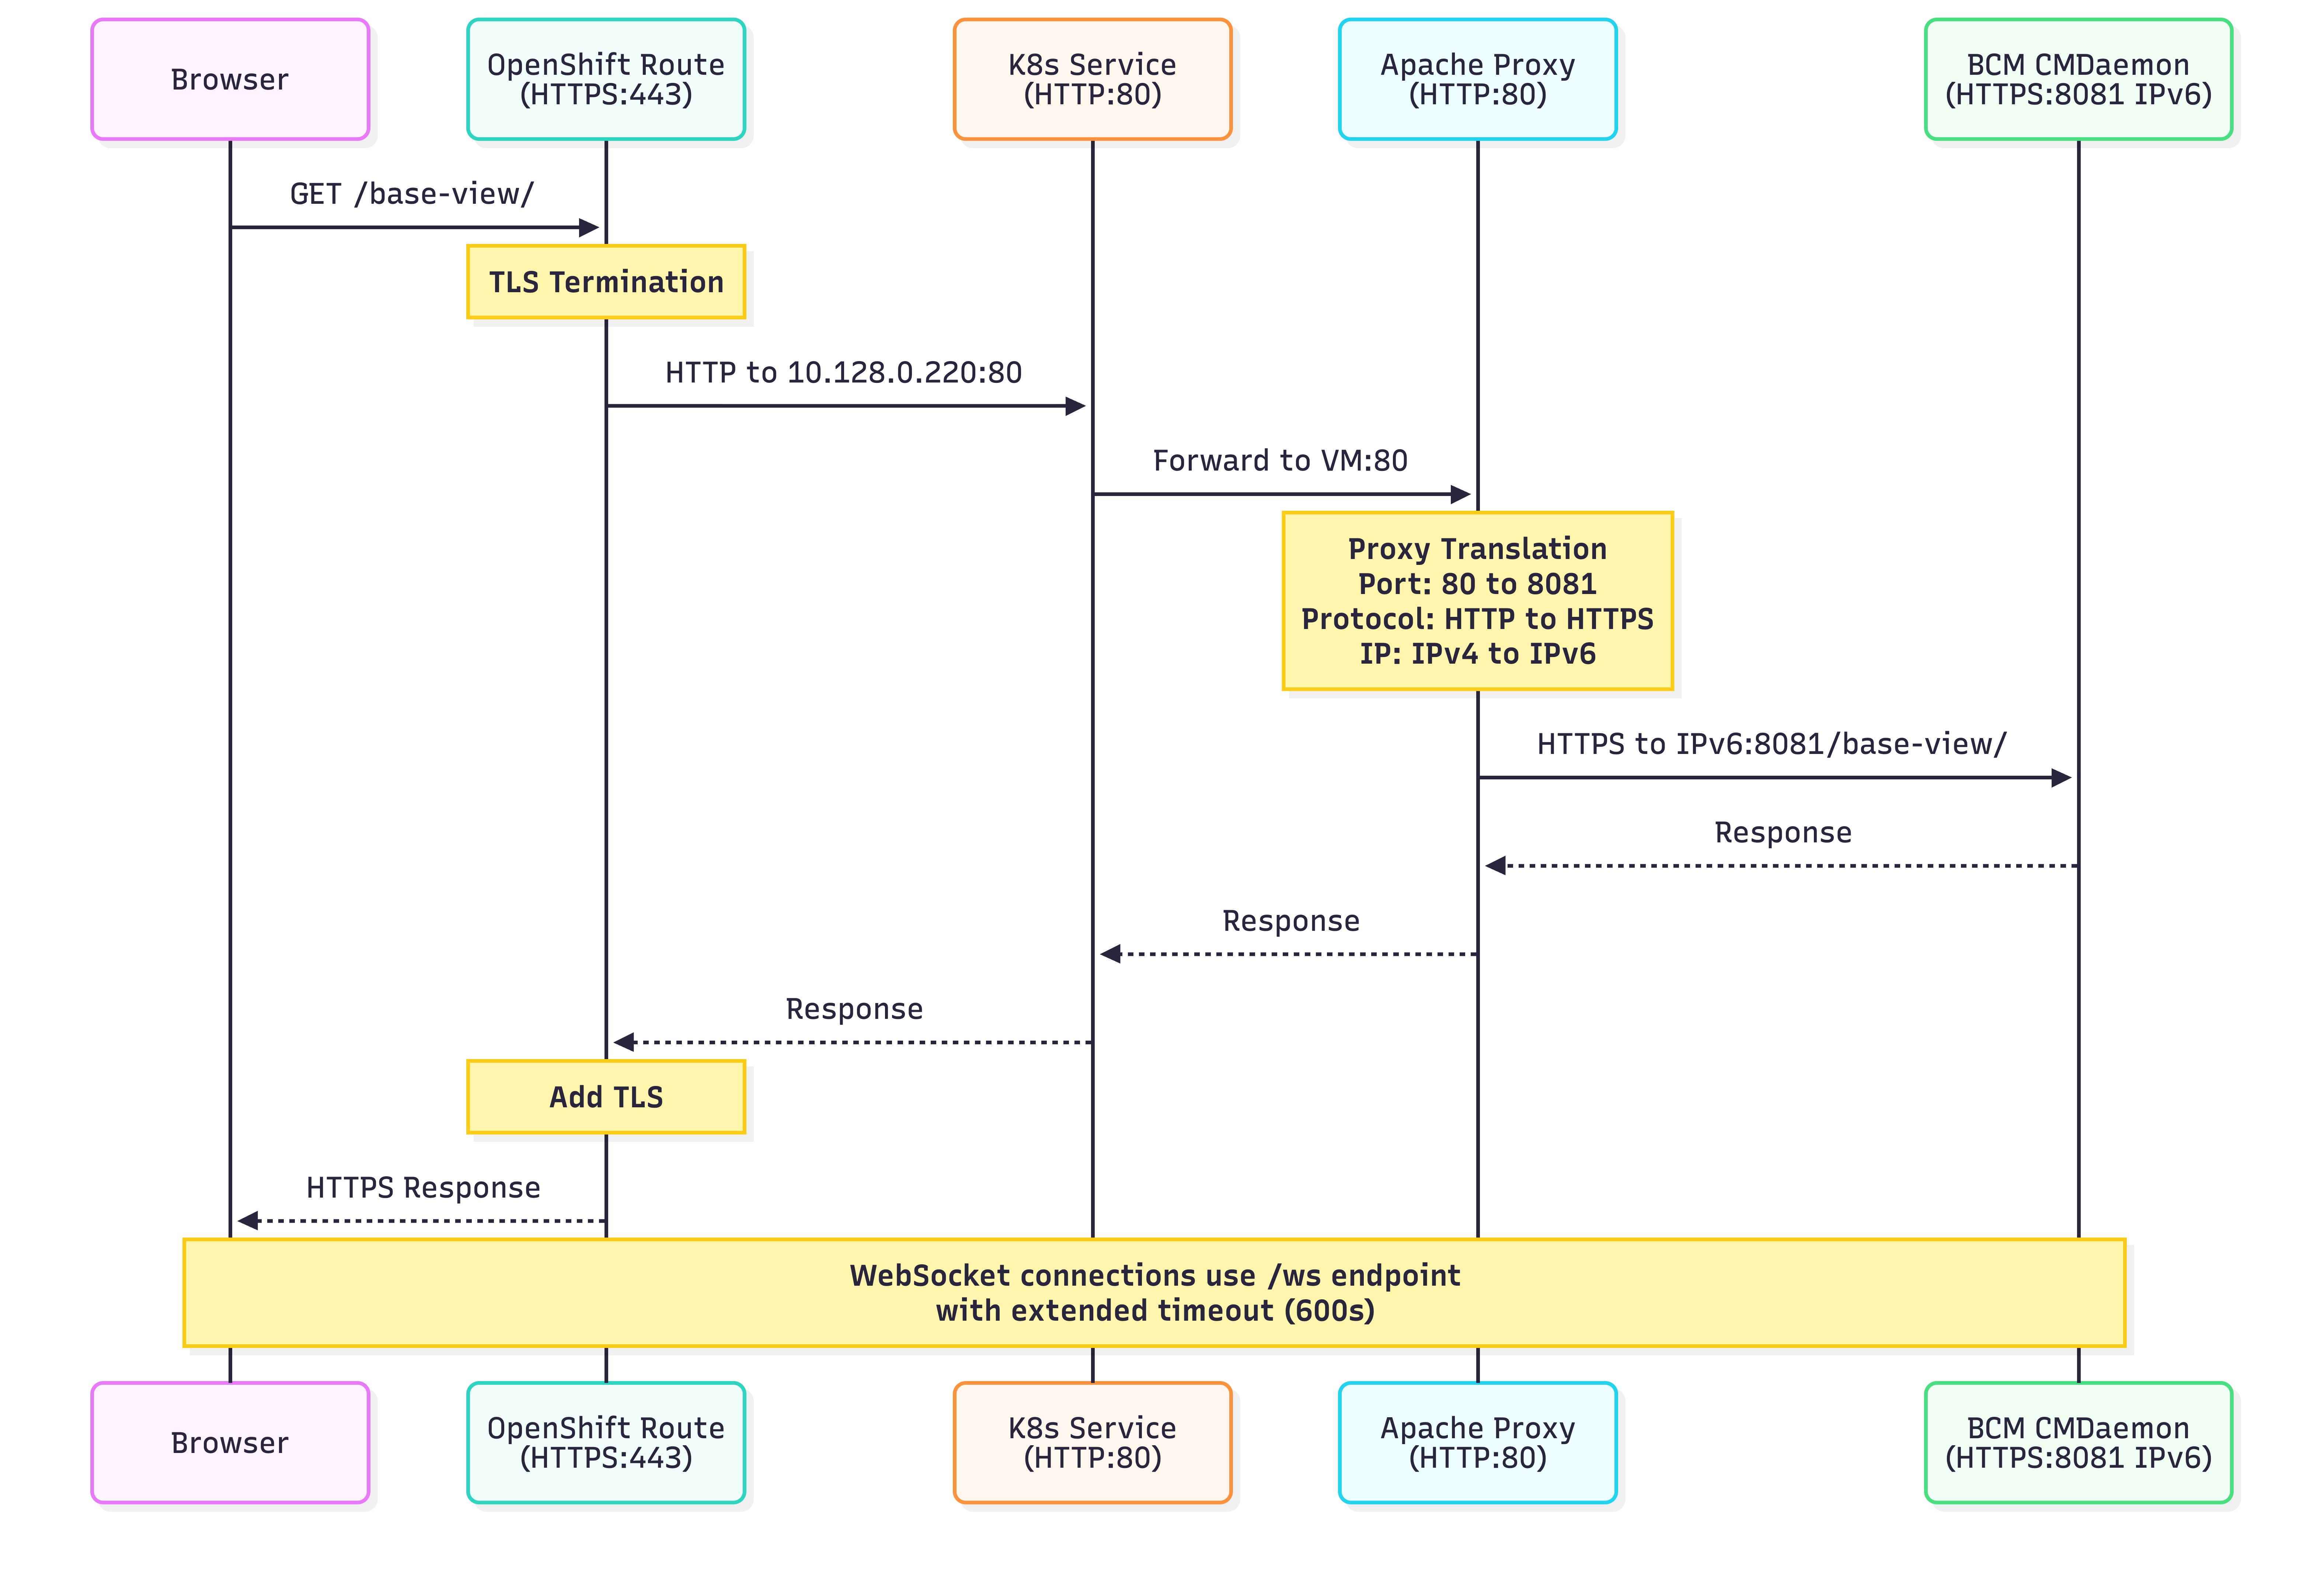
7.1 The Challenge
BCM services listen on IPv6 (:::8081) and custom ports that aren’t compatible with OpenShift Routes. OpenShift Routes only support standard HTTP/HTTPS on ports 80/443.
Verification (inside VM):
# Check listening ports
sudo ss -tlnp | grep 8081
# Shows: tcp LISTEN 0 128 *:8081 *:* users:(("cmd",pid=1919,fd=8))
7.2 Solution: Apache Reverse Proxy
Configure Apache to proxy BCM services from port 80 to 8081:
Inside the VM, create Apache proxy configuration:
# Enable required Apache modules
sudo a2enmod proxy
sudo a2enmod proxy_http
sudo a2enmod ssl

# Create proxy configuration
sudo tee /etc/apache2/conf-available/bcm-proxy.conf > /dev/null <<'EOF'
ProxyRequests Off
ProxyPreserveHost On

# SSL Backend configuration
SSLProxyEngine On
SSLProxyVerify none
SSLProxyCheckPeerCN off
SSLProxyCheckPeerName off

# Base View app
ProxyPass /base-view/ https://[::1]:8081/base-view/
ProxyPassReverse /base-view/ https://[::1]:8081/base-view/

# User Portal app
ProxyPass /userportal/ https://[::1]:8081/userportal/
ProxyPassReverse /userportal/ https://[::1]:8081/userportal/

# API docs
ProxyPass /api/ https://[::1]:8081/api/
ProxyPassReverse /api/ https://[::1]:8081/api/

# CMDaemon JSON-RPC API (needed by Base View)
ProxyPass /json https://[::1]:8081/json
ProxyPassReverse /json https://[::1]:8081/json

# CMDaemon WebSocket
ProxyPass /ws wss://[::1]:8081/ws
ProxyPassReverse /ws wss://[::1]:8081/ws

# Static resources
ProxyPass /static https://[::1]:8081/static
ProxyPassReverse /static https://[::1]:8081/static
EOF

# Enable the configuration
sudo a2enconf bcm-proxy

# Test Apache configuration
sudo apache2ctl configtest

# Reload Apache
sudo systemctl reload apache2
Important Notes:
- Use
[::1](IPv6 localhost) instead of127.0.0.1because BCM binds to IPv6 - Use
https://for backend because port 8081 is BCM’s SSL port - Trailing slashes are important for proper routing
7.3 Verify Proxy Works
Inside the VM:
# Test proxied endpoints
curl -I http://localhost/base-view/
curl -I http://localhost/userportal/

# Should return HTTP 200 OK
Step 8: Expose BCM via OpenShift Route
8.1 Create Service
cat <<EOF | oc apply -f -
apiVersion: v1
kind: Service
metadata:
  name: bcm-service
  namespace: nvidia-bcm
spec:
  selector:
    kubevirt.io/vm: nvidia-bcm
  ports:
  - name: http
    port: 80
    targetPort: 80
    protocol: TCP
  type: ClusterIP
EOF
8.2 Verify Service Endpoints
oc get endpoints bcm-service -n nvidia-bcm
# Should show: ENDPOINTS: <vm-ip>:80
8.3 Create Route
cat <<EOF | oc apply -f -
apiVersion: route.openshift.io/v1
kind: Route
metadata:
  name: bcm-web
  namespace: nvidia-bcm
spec:
  port:
    targetPort: http
  tls:
    termination: edge
    insecureEdgeTerminationPolicy: Redirect
  to:
    kind: Service
    name: bcm-service
  wildcardPolicy: None
EOF
8.4 Get Access URL
echo "BCM URL: https://$(oc get route bcm-web -n nvidia-bcm -o jsonpath='{.spec.host}')"
Step 9: Fix Landing Page Links
The BCM landing page has hardcoded URLs with port 8081 that need to be updated.
Inside the VM:
9.1 Update constants.php
# Fix URLs in PHP constants
sudo sed -i "s|:8081/base-view'|/base-view/'|g" /var/www/html/constants.php
sudo sed -i "s|:8081/api'|/api/'|g" /var/www/html/constants.php
sudo sed -i "s|:8081/userportal'|/userportal/'|g" /var/www/html/constants.php

# Verify changes
grep "url.*SERVER_NAME" /var/www/html/constants.php
9.2 Make Links Open in New Tabs
# Add target="_blank" to card links
sudo sed -i 's|<a class="btn-floating halfway-fab|<a target="_blank" class="btn-floating halfway-fab|g' /var/www/html/index.php

# Verify
grep -n "target=" /var/www/html/index.php
Step 10: Access BCM
10.1 Access URLs
# Get your BCM URL
oc get route bcm-web -n nvidia-bcm -o jsonpath='{.spec.host}'
Access in your browser:
- Landing Page:
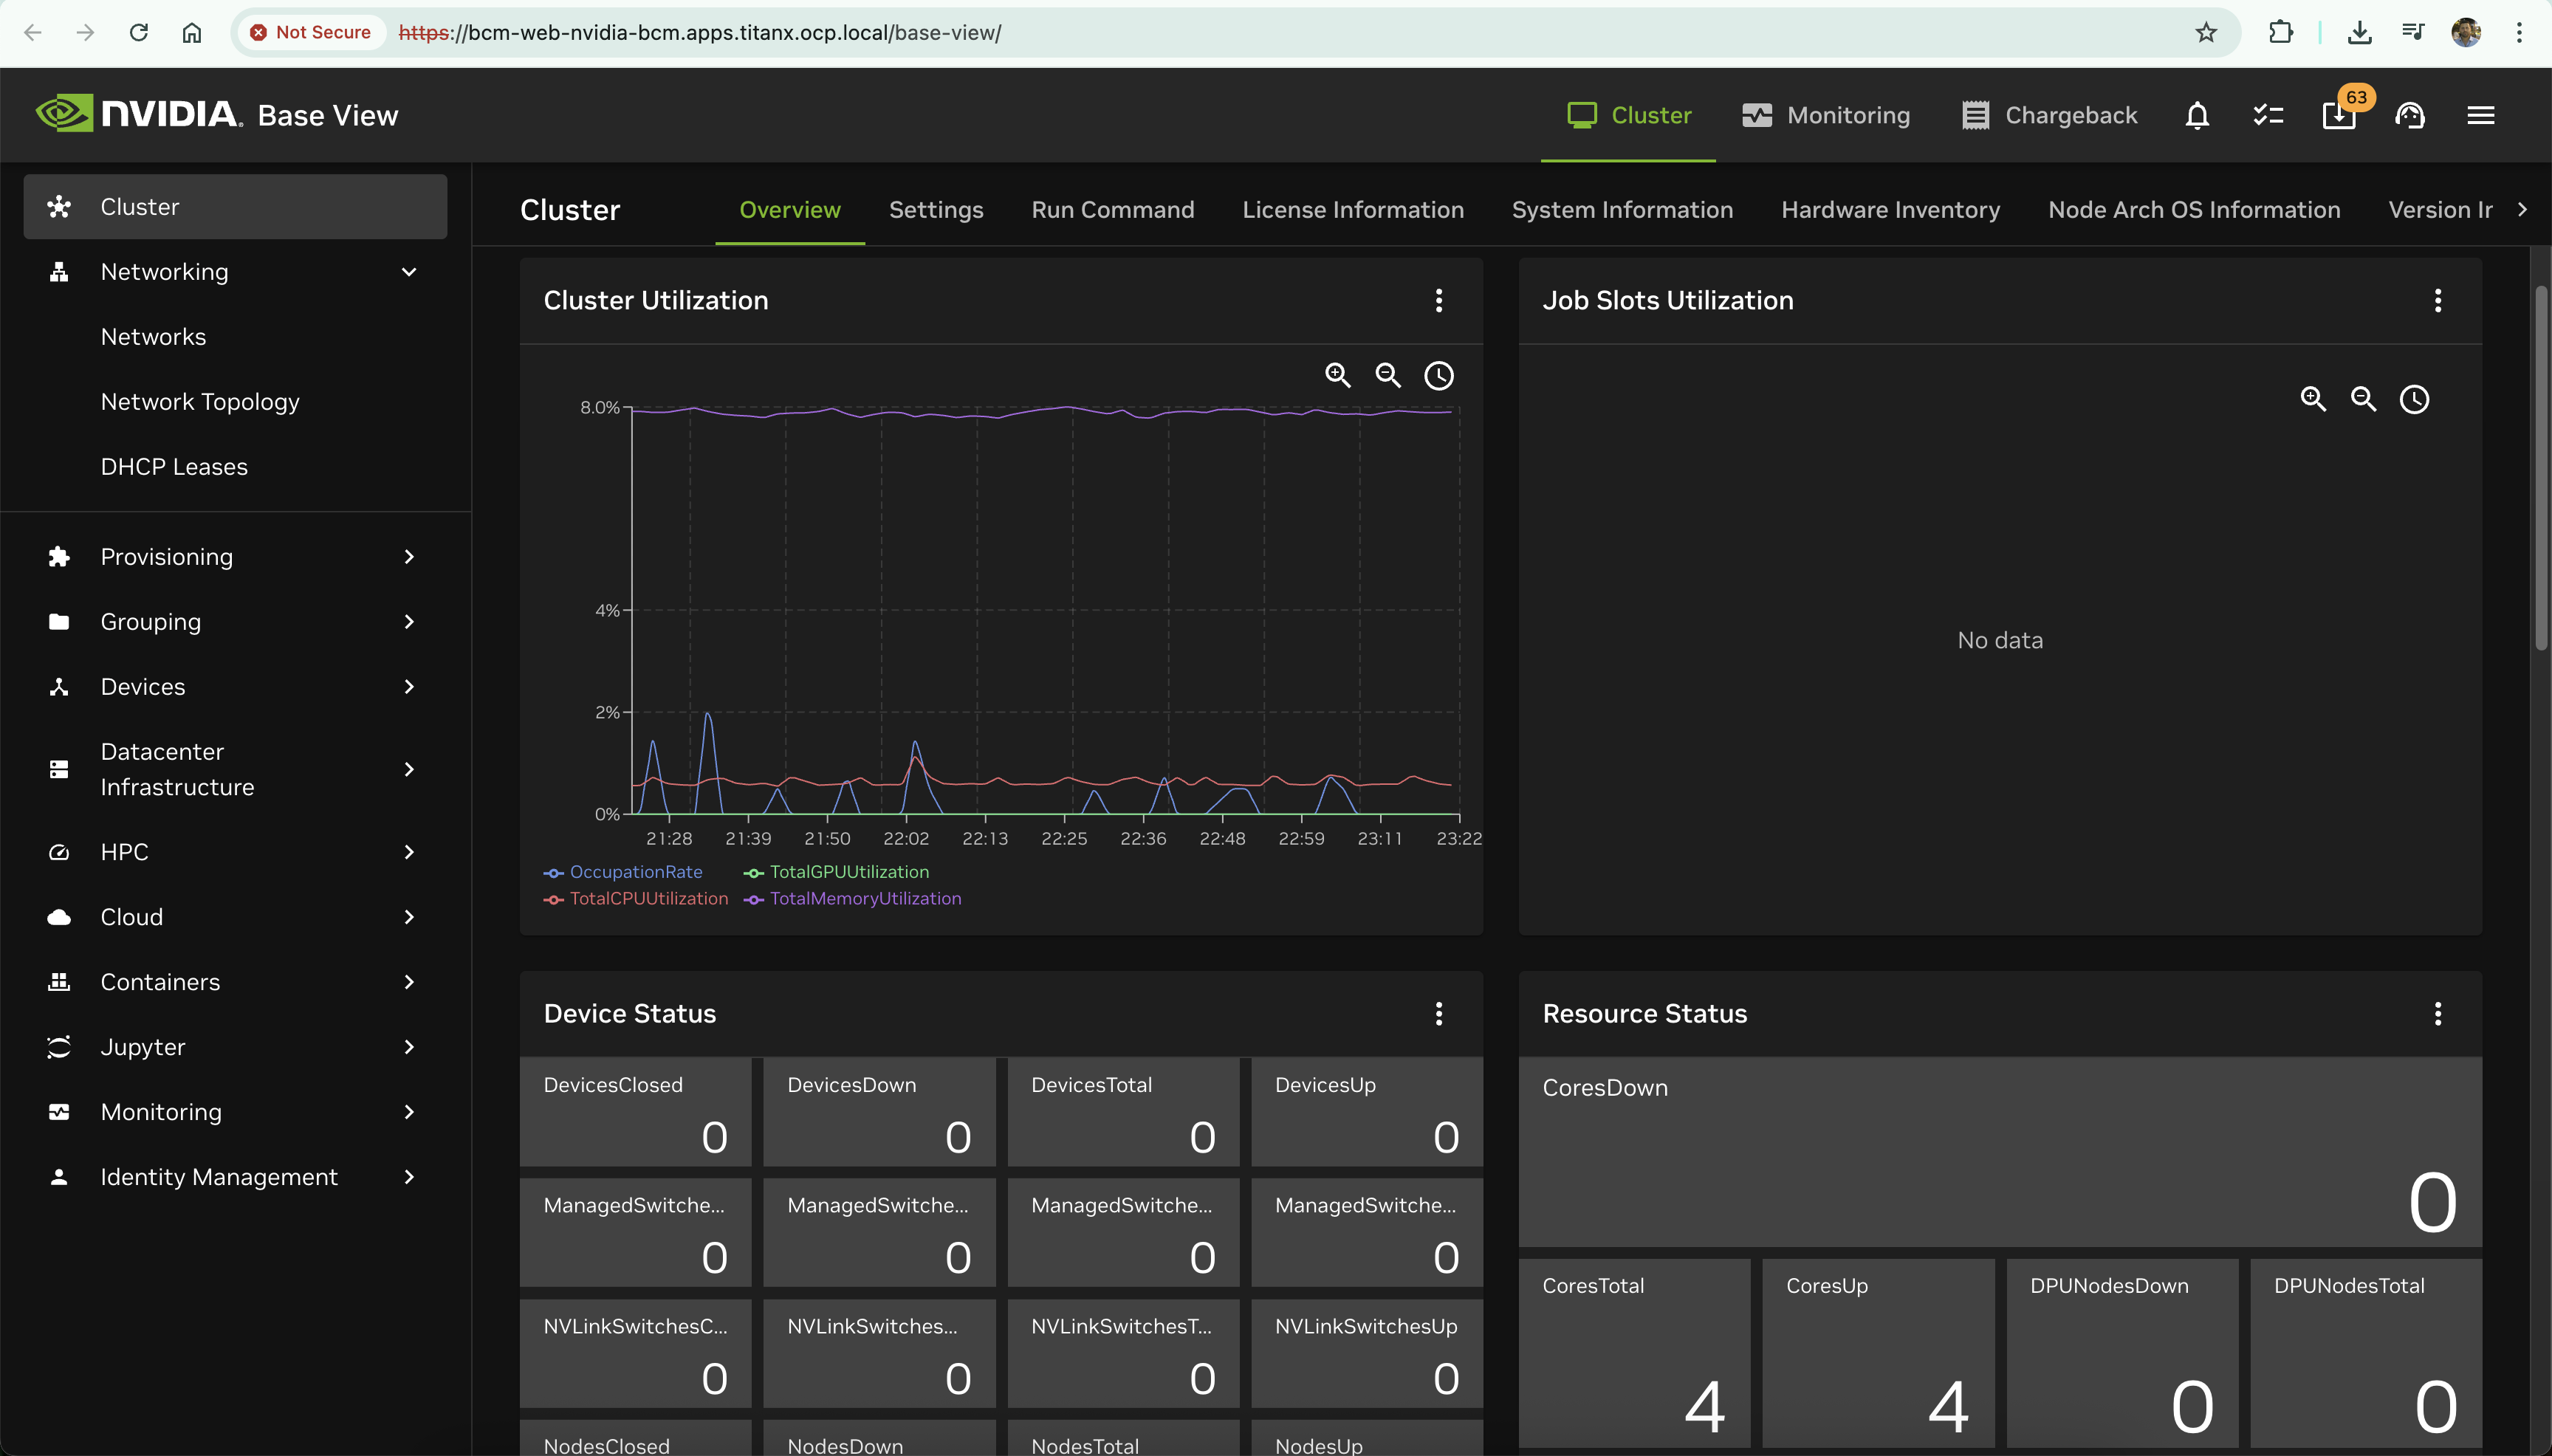
https://bcm-web-nvidia-bcm.apps.<cluster-domain>/ - Base View:
https://bcm-web-nvidia-bcm.apps.<cluster-domain>/base-view/
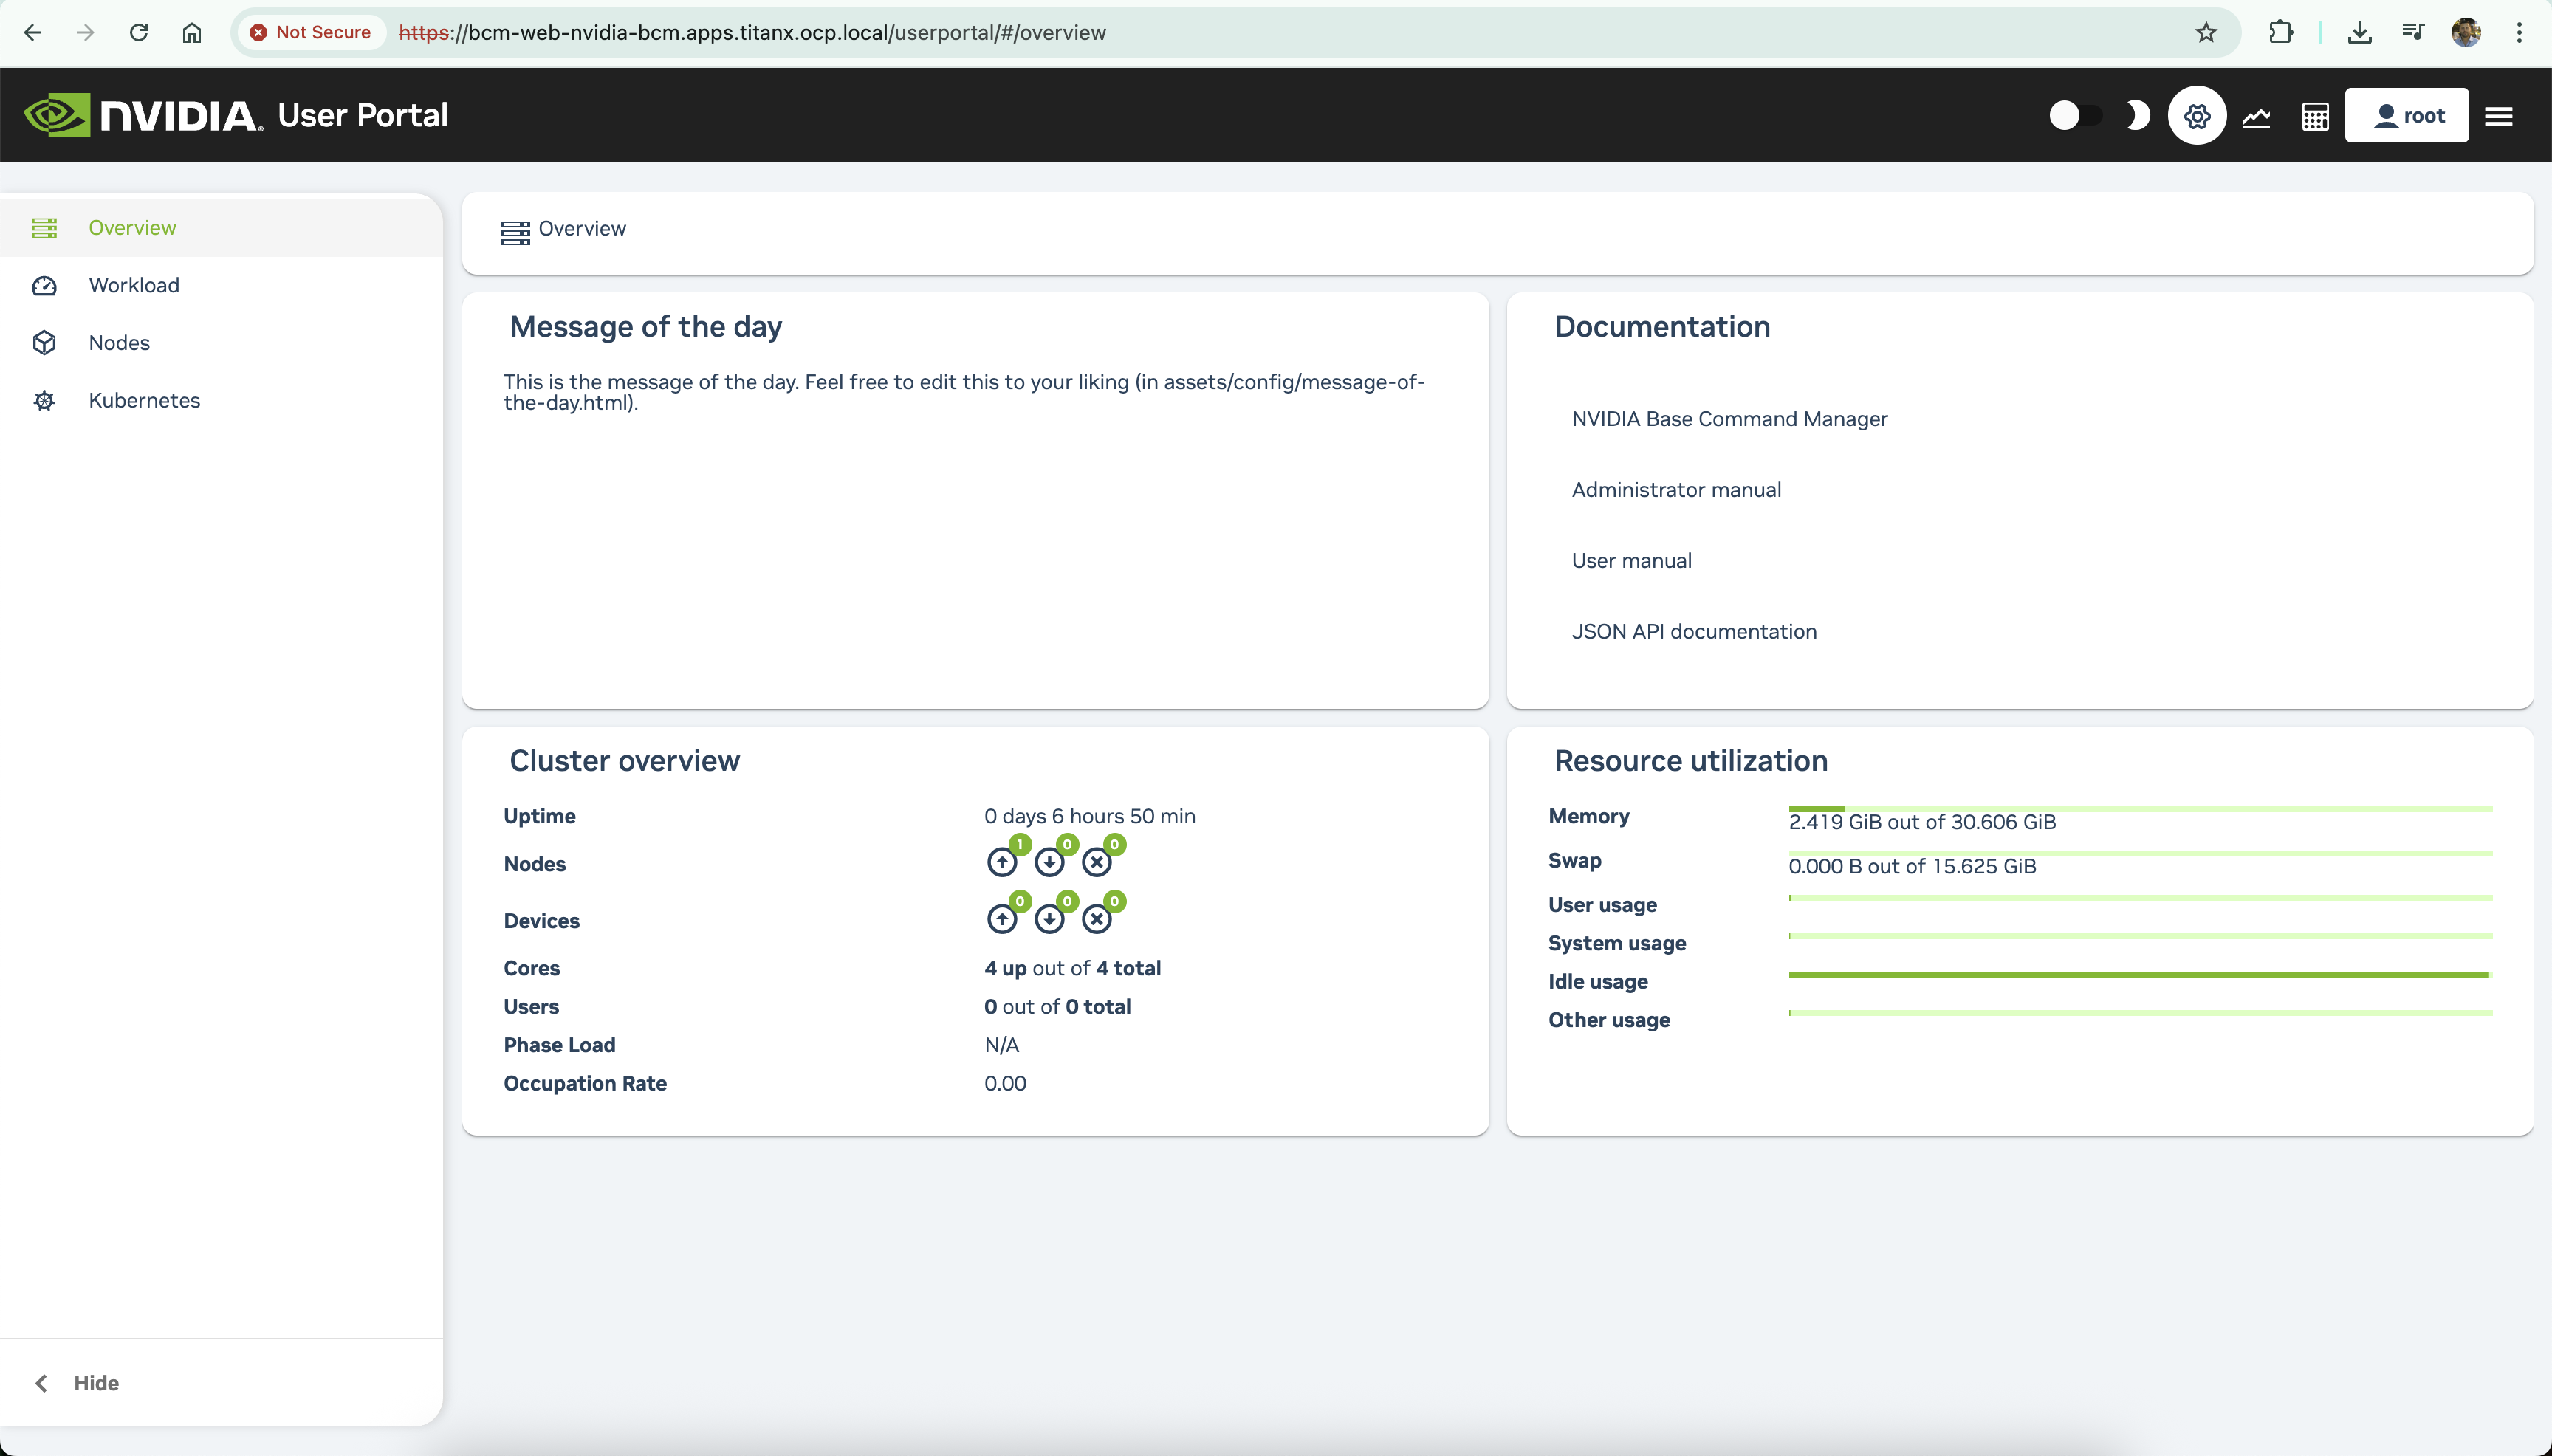
- User Portal:
https://bcm-web-nvidia-bcm.apps.<cluster-domain>/userportal/
- API Docs:
https://bcm-web-nvidia-bcm.apps.<cluster-domain>/api/
10.2 Login
Use the admin credentials you set during BCM installation.
Troubleshooting
Issue: Connection Refused on Port 8081
Symptom: curl: (7) Failed to connect to 10.128.0.220 port 8081: Connection refused
Cause: BCM services listen on IPv6 only (:::8081)
Solution: Use IPv6 localhost ([::1]) in Apache proxy configuration instead of 127.0.0.1
Issue: 502 Proxy Error
Symptom: HTTP/1.1 502 Proxy Error
Cause: Backend using HTTP instead of HTTPS
Solution: Update proxy configuration to use https://[::1]:8081 instead of http://[::1]:8081
Issue: Service Has No Endpoints
Symptom: oc get endpoints bcm-service shows <none>
Cause: Service selector doesn’t match VMI labels
Solution:
# Check VMI labels
oc get vmi nvidia-bcm -n nvidia-bcm --show-labels

# Update service selector to match
oc edit svc bcm-service -n nvidia-bcm
# Set: selector.kubevirt.io/vm: nvidia-bcm
Issue: DataVolume Stuck in WaitForFirstConsumer
Symptom: DataVolume phase shows WaitForFirstConsumer
Cause: Storage class has volumeBindingMode: WaitForFirstConsumer
Solution: Use --force-bind flag with virtctl:
virtctl image-upload dv <name> --force-bind ...
Issue: Upload Proxy Not Found
Symptom: virtctl image-upload fails to find upload proxy
Cause: Upload proxy route not configured
Solution: Explicitly provide upload proxy URL:
virtctl image-upload dv <name> \
  --uploadproxy-url=https://$(oc get route -n openshift-cnv cdi-uploadproxy -o jsonpath='{.spec.host}')
Performance Tuning
VM Resources
Adjust based on your workload:
# For lighter workloads
resources:
  requests:
    memory: 16Gi

# For production
resources:
  requests:
    memory: 64Gi
Storage Performance
LVMS on NVMe provides excellent performance for VM workloads. For better performance:
# Check thin pool configuration
oc get lvmcluster -n openshift-lvm-storage -o yaml

# Ensure overprovisionRatio is reasonable (default 10 is good)
# Ensure sizePercent is 90% for optimal space utilization
Adding Compute Nodes
Once BCM is running, you can add compute nodes as additional VMs:
apiVersion: kubevirt.io/v1
kind: VirtualMachine
metadata:
  name: bcm-compute-01
  namespace: nvidia-bcm
spec:
  running: false
  template:
    spec:
      domain:
        cpu:
          cores: 16
        devices:
          gpus:
          - name: gpu1
            deviceName: nvidia.com/GPU
        resources:
          requests:
            memory: 64Gi
      networks:
      - name: external
        pod: {}
      - name: internal
        multus:
          networkName: bcm-internal-network
      # ... additional configuration
Key points:
- Attach to same
bcm-internal-network - Use IP range
192.168.100.50-200(defined in BCM DHCP) - Enable GPU passthrough for AI workloads
Security Considerations
SSL Certificates
For production, replace self-signed certificates:
BCM Certificates (inside VM):
# Located at:
/cm/local/apps/cmd/etc/cert.pem
/cm/local/apps/cmd/etc/cert.key
OpenShift Route:
# Add custom TLS certificate to route
oc create secret tls bcm-tls \
  --cert=bcm.crt \
  --key=bcm.key \
  -n nvidia-bcm

# Update route to use it
oc patch route bcm-web -n nvidia-bcm \
  --type merge \
  -p '{"spec":{"tls":{"certificate":"...", "key":"..."}}}'
Network Policies
Restrict access to BCM:
apiVersion: networking.k8s.io/v1
kind: NetworkPolicy
metadata:
  name: bcm-access
  namespace: nvidia-bcm
spec:
  podSelector:
    matchLabels:
      kubevirt.io/vm: nvidia-bcm
  policyTypes:
  - Ingress
  ingress:
  - from:
    - namespaceSelector:
        matchLabels:
          name: openshift-ingress
    ports:
    - protocol: TCP
      port: 80
RBAC
Create dedicated service account for BCM operations:
oc create serviceaccount bcm-admin -n nvidia-bcm
oc adm policy add-role-to-user admin system:serviceaccount:nvidia-bcm:bcm-admin -n nvidia-bcm
Monitoring and Logging
VM Metrics
Monitor VM performance:
# Get VM metrics
oc get vmi nvidia-bcm -n nvidia-bcm -o json | jq '.status'

# Check resource usage
oc adm top pod -n nvidia-bcm
BCM Logs
Access BCM logs inside the VM:
# CMDaemon logs
sudo journalctl -u cmd.service -f

# Apache logs
sudo tail -f /var/log/apache2/access.log
sudo tail -f /var/log/apache2/error.log

# BCM audit logs
sudo tail -f /var/spool/cmd/audit.log
Backup and Disaster Recovery
VM Snapshots
Create VM snapshots for backup:
cat <<EOF | oc apply -f -
apiVersion: snapshot.kubevirt.io/v1alpha1
kind: VirtualMachineSnapshot
metadata:
  name: bcm-snapshot-$(date +%Y%m%d)
  namespace: nvidia-bcm
spec:
  source:
    apiGroup: kubevirt.io
    kind: VirtualMachine
    name: nvidia-bcm
EOF
BCM Data Backup
Inside the VM:
# Backup BCM database
sudo mysqldump -u cmdaemon -p cmdaemon > /backup/cmdaemon-$(date +%Y%m%d).sql

# Backup configuration
sudo tar czf /backup/bcm-config-$(date +%Y%m%d).tar.gz \
  /cm/local/apps/cmd/etc \
  /etc/cm \
  /var/spool/cmd
Conclusion
Deploying NVIDIA Base Command Manager on OpenShift Virtualization requires additional configuration compared to traditional bare-metal deployments, primarily due to:
- Port constraints: OpenShift Routes require standard ports (80/443)
- IPv6 binding: BCM services default to IPv6
- Reverse proxy needs: Apache bridges the gap between BCM and OpenShift networking
However, this deployment pattern offers significant advantages:
- Cloud-native integration: Leverage Kubernetes for BCM lifecycle management
- Resource efficiency: Dynamic resource allocation and thin provisioning
- Simplified networking: Unified ingress through OpenShift Routes
- Better isolation: Namespace-based security and multi-tenancy
- GitOps ready: Infrastructure-as-code for BCM deployment
Additional Resources
- NVIDIA Base Command Manager Documentation: https://docs.nvidia.com/base-command-manager/
- OpenShift Virtualization Documentation: https://docs.openshift.com/container-platform/4.20/virt/about-virt.html
- LVMS Documentation: https://docs.redhat.com/en/documentation/openshift_container_platform/4.20/html/storage/persistent-storage-using-local-storage#persistent-storage-using-lvms
About This Guide
This guide was created based on a real-world deployment of BCM 11.0 on a single-node OpenShift cluster with LVMS storage. The troubleshooting steps and solutions documented here reflect actual challenges encountered and resolved during the deployment process.
If you found this guide helpful or have suggestions for improvement, please share your feedback!
Author: Marius Palimariu
Date: December 2025
BCM Version: 11.0 (Ubuntu 24.04 base)
OpenShift Version: 4.20